
 448
448
Minisplit Design
Intro:
Looking to install mini splits on your next job? Great! Let's look at some design aspects that get missed on a lot of jobs. We will go over system design, product types, placement and a little bit of install in this article.
Design:
Load Calcs: load calculations are probably the most missed thing on mini split jobs. We see a lot of oversized mini splits get put into spaces and as a result we end up with poor operation. The can mean short cycling on heating and cooling modes. Therefore not keeping up with temperature and then obviously making your customer suffer the consequences. We have also seen them sized too small as well. Usual rule of thumb calculations do not work well as they have a lot of padding built in for duct loss. So for best results, please utilize our design team and they can help you out with the load calculations. Once the load calcs have been completed, we can move on to the next step and that is choosing the right equipment.
First, a little note on customer expectations. You will be way ahead and have a way happier customer if you ask some questions first.....
- What kind of units are you looking for? - Let them pick, but you may have to trump this if the application will not work.
- What are the hot or cold spots in your home?
- What temperatures do you desire to have for summer and winter? - This is a big one when it comes to unit selection.
- Where can we put the outdoor unit? - This will be good so you can see if minimum/maximum line set lengths will be an issue or not. Or if clearances will be an issue. Then you can compromise with homeowner.
- Can we get you in on a maintenance program? Poor maintenance is a big cause of mini split failure.
Equipment selection:
Equipment selection can be done when the load calculation is performed. Our design team can quote it out for you as well, but if you want to take things into your own hands, then you need to consider some resources to make sure you're choosing the right unit.
A. You'll want to familiarize yourself with equipment design and technical manuals. These manuals provide the tables in which the capacities are shown at design temperatures. No system should be sized by nominal capacity alone(9k,7k,12k, etc). We need to refer to the capacity tables for these units to ensure we select the correct unit for the application.
See example below....
ex. This is the model AOUH12LMAS1/ASUH12LMAS
Heating Capacity Chart from Design and Tech Manual:
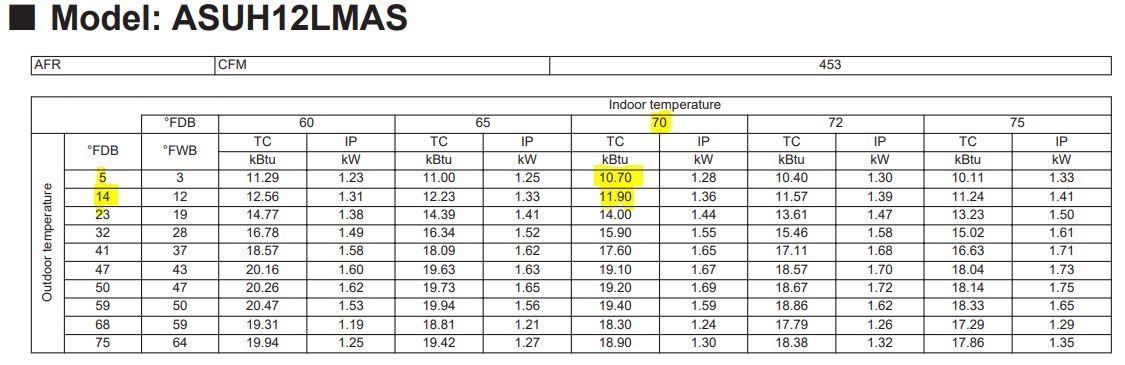
In this example we see that at the design outdoor temperature of 5° in heating mode gets you 10,700 BTUs at a 70 degree set point inside. Again, your customer expectation may be 75 degrees for winter time heating. Look at the chart again, now we have only 10,110 BTUs.
Go back to your load calculation and verify that this will cover that load calculation. Again if you have set points from your customer, be sure to relay to the design team so they can put that in. Also, relay that you want this unit to be able to heat the space when its -10 degrees. This will then get added into load calculation, then we can select the correct unit.
If you are looking to heat this solely by this unit, you may want to a higher heat model. If you get to 0 degrees you will be probably around the 8000 BTU mark and our heating load has gone up. If that is not an option you will want to offer a secondary source of heating. Remember this is all about customer expectations, be really clear so you can deliver those expectations.
Now, let's look at your cooling load. Again, we can go to ashrae design of 87, but remember that above 87 the temperature may not come down. Again, customer expectations. If they say they want the unit to be able to cool at 95 then make sure to look at chart correctly. This will give you plenty of coverage for the space. Knowing most people I would plan on 70 degree indoor temp, but design would be closer to 75.
Cooling Capacities:
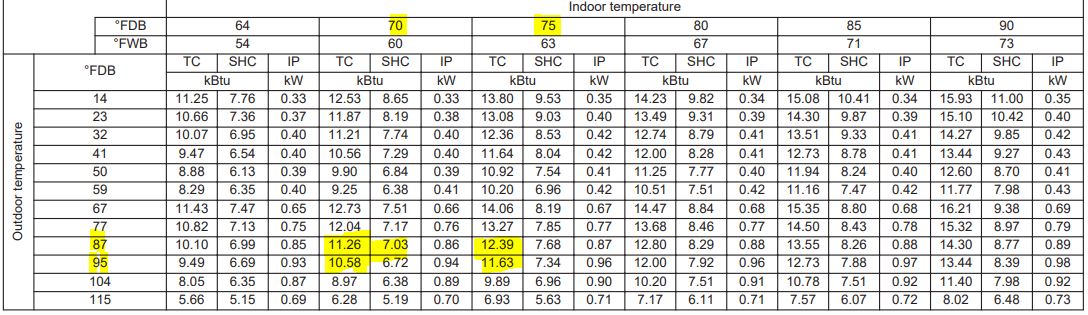
So we see that this 12k unit can get us about 12k at 75 degree set temperature. But at 70 degrees we are 10.5-11.3 kBTU's. Is it enough for the space? Or too much?
Small rooms typically like a 10x12 room can potentially have a cooling load as low as 2000 BTUs and the heating may as low as 3,000. So depending on if we are selecting multi-zone or single zone units, we need to look at the lowest modulation rate of the unit we pick. This means that if the unit we pick has a lowest modulation rate of 3400 BTUs we are basically going to be short cycling in the cooling mode and possibly short cycling in the heating mode as well, especially during the shoulder seasons. Short cycling and cooling will cause a room to go cold but it will still be humid. And in heating it may just shut on and off and it may never heat the room up to the preferred set point. So again low calc and design will get you out of the woods on most mini split problems. If you have lots of small rooms we may have to consider a VRF product instead due to lower btu heads and better modulation rates.
See submittal below for modulation rates.

Product types:
Mini-splits have an array of different indoor units that can be used on a house. Here are some things to keep in mind.
- For wall units specifically, avoid placing them in direct sunlight or above tall objects which can lead to short cycling. Wall mounts should be positioned high on the wall with the longest throw possible to promote air circulation. Wall units require drainage, so utilizing an outside wall works best if possible. Otherwise, consider where to place the pump and/or drain. Ensure the wall mounts are installed with future service access in mind.
- Ducted Units are a nice addition since we can reduce the number of heads and feed a couple rooms. This then keeps the look of the room good and you don't have anything on a wall. But with ducted units, we have to make sure that the static pressure settings are set correctly and that the duct work is built correctly.
- Ceiling cassettes work well in commercial areas as they do in homes. Only thing to consider in the home is having access to the boards. Ceiling cassettes have a lift pump for condensate but they can't actually pump it. So they can lift condensate up to about 26 in and then the condensate has to gravity drain the rest of the way.
- Ceiling mounts can be a good option for hallways and places. You don't have room on the wall to put them. .
- If you have and upstairs room with limited wall space because of the vaulted ceilings. Consider the floor mount units. These mount near the floor and have the ability to blow from the bottom and the top of the unit to ensure good circulation of the room. Many people have tried putting wall mount units halfway up the wall in these places and it just doesn't work well.
Once all these things are in place design, equipment selection and system design, then next is the install. Installation should be very simple on these systems. Three things to remember is clean, dry, and tight. If we can do this, we will more likely be very successful on the install with little to no issues. Lets go over installation next. This is one of the biggest things that contribute to service issues in the future.
- Verify line set lengths. Be sure during your design to look for all the places where the lines that will run and measure it. All units have a minimum and maximum line set that you must adhere to. Otherwise you risk compressor damage. Most units multi-zone and single typically require a minimum of 16 feet from outdoor unit to the head. Most multizone units require at least 49 feet minimum line set length. So if you need to move around your outdoor unit to make that line set run look good.
- Flaring make sure you are using best practices with flaring. This means using a sharp cutting wheel in eccentric cone flare tool, and a little bit of POE oil to put on the face of the flare when you make your connection. Do not oil threads or use thread sealant. This typically makes the fitting come loose and leak. Then after the connection is made, go ahead and use a torque wrench and get it within spec according to the install manual.
- Communication cable: be sure that all runs of communication cable are made and one continuous piece. No wire nuts or splices or anything like that is allowed. If you do this you will end up with random communication errors and you will be back on that job multiple times for no good reason. Take your time measure twice before cutting the cable. Also used terminals on your wire connections to the units. And not only makes them neater but more secure. Be sure to label your wires coming back from the indoor units correctly, especially on multi-zone units so you don't end up swapping them and putting them on the wrong zone. This has been done so many times and the problem doesn't rear its head all the time. So keep it organized and use some tape.
- Electrical: You need to make sure before sending power to the unit that you are within the 187 to 253 volt range. Being outside of the range can cause damage to the boards and you will end up with communication errors on startup typically. If you are running high voltage or low voltage, consider a line voltage monitor with surge protection. This will cut the unit out so we don't lose components. Cheap insurance to keep your customer happy
- Placement: These are heat pumps so they do need to be off the ground and above snow level. I like to suggest using at least an 18 inch stand or wall mount the units. This will prevent ice buildup into the unit which can lead to cracking of the outdoor unit coil. Make sure units are placed where the fan is not going to cause discomfort when walking by. Driveways, decks, anywhere where people hang out, just take careful consideration.
- Pressure Testing, Vacuuming, Charging: After all this has been done. Be sure to pressure. Test the system to 600 PSI and make it hold for an hour, then continue on to vacuuming and you'll want to get down to about 300 and then not let it rise over 500 in a 15 minute wait. If you do need to add charge, be sure you are calculating and weighing in the charge.
After the installation is done, be sure to go over the remote controls with your customer so they know how to operate it. Let them know if it is a wireless remote that it is not a thermostat. Then make sure that you hop on to whichever website you need to and register the equipment. This makes sure that your customer is covered if something goes wrong.
If you have any questions, feel free to reach out to our technical service or design team and we'll be happy to assist.
Thanks for reading and hopefully the rest of your installs will go well.

